Control panel features
(continued)
User Guide
3
HP all-in-one
overview
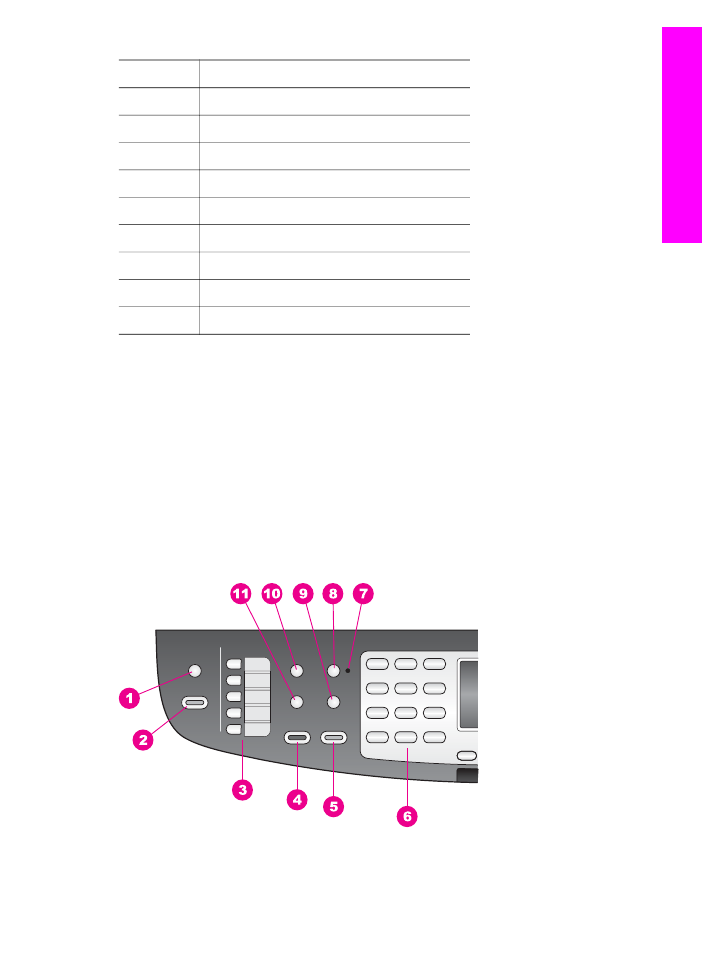
Label
Name and Description
1
Scan To
: Select a scan destination.
2
Start Scan
: Start a scan job and send it to the destination you selected using the
Scan To
button.
3
One-touch speed dial buttons
: Access the first five speed dial numbers.
4
Start Fax Black
: Start a black and white fax.
5
Start Fax Color
: Start a color fax.
6
Keypad
: Enter fax numbers, values, or text.
7
Auto Answer light
: When the
Auto Answer
light is on, the HP all-in-one is set to
receive faxes automatically.
8
Auto Answer
: Set the fax function to answer the phone automatically after a
specified number of rings.
9
Redial/Pause
: Redial the most recently dialed number, or insert a 3-second pause
in a fax number.
10
Menu
: Select fax options, including Resolution, Lighter/Darker, Two-Sided Send,
and several other options using the
Menu
button in the Fax area.
11
Speed Dial
: Select a speed dial number.
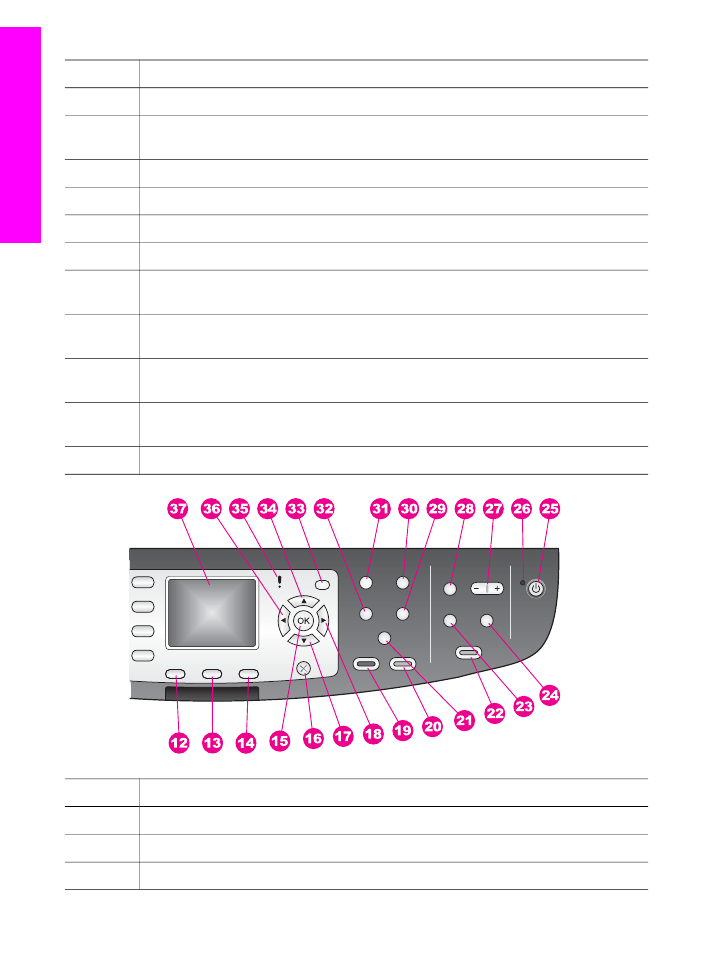
Label
Name and Decription
12
Two-Sided
: Perform a two-sided copy or fax job.
13
Tray Select
: Select a paper tray.
14
HP Instant Share
: Access the HP Instant Share features.
Chapter 1
4
HP Officejet 7300/7400 series all-in-one
HP all-in-one
overview

Label
Name and Decription
15
OK
: Select a menu, setting, or select photos in the color graphics display for
printing.
16
Cancel
: Stop a job, exit a menu, or exit settings.
17
Down arrow
: Navigate down through menu options.
18
Right arrow
: Increase values, or go forward when viewing photos on the color
graphics display.
19
Start Copy Black
: Start a black and white copy job.
20
Start Copy Color
: Start a color copy job.
21a
Collate
: Produce sets of copies in the exact order they are scanned from the
document feeder tray. (HP Officejet 7400 series all-in-one only)
21b
Lighter/Darker
: Access a menu that allows you to lighten or darken copy output.
(HP Officejet 7300 series all-in-one only)
22
Print Photos
: Print the photo from your memory card currently displayed in the
color graphics display, or print all of the photos you selected using the
OK
button.
23
Proof Sheet
: Print a proof sheet when a memory card has been inserted in a
memory card slot. A proof sheet shows thumbnail views of all the photos on the
memory card. You can select photos on the proof sheet, then print those photos by
scanning the proof sheet.
24
Rotate
: Rotate the currently displayed photo on the color graphics display 90
degrees. Subsequent presses continue to rotate the photo 90 degrees.
25
On
: Turn the HP all-in-one on or off. When the HP all-in-one is off, a minimal
amount of power is still supplied to the device. To completely disconnect the power
supply to the HP all-in-one, turn the device off, and then unplug the power cord.
26
On light
: When lit, the
On
light indicates that the HP all-in-one is on. The light blinks
while performing a job.
27
Zoom
: Enlarge the image on the color graphics display. You can also use this
button to adjust the crop box when printing.
28
Menu
: Print a photo, transfer photos to your computer, see a slide show, or share
photos with HP Instant Share using the
Menu
button in the Photo area.
29
Number of Copies
: Select the number of copies using either the or the , or
enter the number directly using the keypad.
30
Quality
: Control the speed and quality of copies.
31
Menu
: Select copy options, including Tray Select, Paper Type, Paper Size, and
several other options using the
Menu
button in the Copy area.
32
Reduce/Enlarge
: Change the size of the photo for printing.
(continued)
User Guide
5
HP all-in-one
overview
Label
Name and Decription
33
Setup
: Access the menu system for reports, fax settings, and maintenance. Also
access product-launched Help.
34
Up arrow
: Navigate up through menu options.
35
Attention light
: When blinking, the
Attention
light indicates an error has occurred
that requires your attention.
36
Left arrow: Decrease values, or go back when viewing photos on the color graphics
display.
37
Color graphics display
: View menus, photos, and messages. The color graphics
display is stationary on this device.